FTTC bonding with Debian and TEQL

Being a massive geek for longer than I can remember, I’m one of those people who has multiple internet connections at home. Thankfully, I also run the ISP who delivers these internet connections which affords me quite a lot of flexibility in how the service is delivered.

I have used pfSense for a number of years, recently acquiring a dedicated Netgate SG-3100 appliance. In the past, I’ve had a Cisco 887VA do the PPPoE and route IP addresses to my pfSense appliance. This has worked well but I noticed recently that the 887VA wasn’t able to route IPv6 as quickly as IPv4, so I decided to take the one (now two) VDSL modems straight into the Netgate and utilise PPPoE there.

Ordinarily, I’ve done simple load balancing in pfSense, using gateway groups and firewall rules to route traffic accordingly. This works well for IPv4 but doesn’t work well for IPv6 and has a couple of other small annoyances such as breaking sites which utilise sessions and so on. Easily fixed by pinning certain types of traffic to one particular gateway group with a primary connection and a failover connection. However, I thought I could go one better and wanted to achieve the following:

  • All traffic in / out should utilise one set of IPv4 or IPv6 addresses, rather than two sets as is standard in a normal load balancing scenario;
  • Traffic should be split as equally as possible across both FTTC connections (they sync within 1M of eachother);
  • The solution should be robust and be able to tolerate some element of failure. e.g. One connection goes down in the middle of the night due to carrier maintenance;
  • The solution should be able to recover gracefully without intervention from myself if connections disconnect and reconnect;
  • No additional latency or significant loss in throughput should be observed. Neither should any packet loss be introduced.

The Solution

This is where Linux comes in. Specifically, Debian 10.

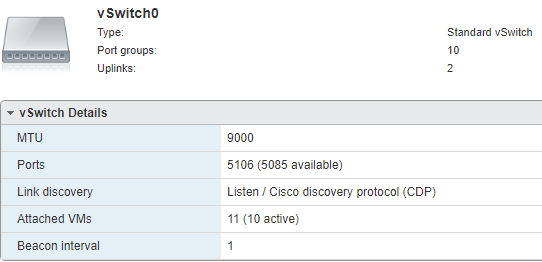
I started by firing up a Debian 10 virtual machine on my ESXi host, creating some new VLANs and configuring some tagged/untagged ports on my switch. This was to allow each FTTC modem to sit on its own VLAN and be safely passed through to ESXi where I could create new port groups for each respective VLAN. It’s important to note at this point that in order to utilise an MTU of 1500 on my ppp interfaces in Linux, I needed to ensure jumbo frames was enabled on the ports on my switch that the ESXi host and modems were plugged into. I then made sure that jumbo frames were also enabled on my vSwitch in ESXi.

Finally, I was ready to start testing in Debian. The client side and remote side routers need to be configured to route traffic for your IP addresses down both lines at the same time. In my case, I’m lucky enough to be able to control the ISP side of the routing and I use Firebrick routers which allow bonding of this nature out of the box. I started by configuring the Firebricks to route traffic destined for my IPv4 and IPv6 addresses down both connections with the same preference.

For the client-side, I started out using ECMP (Equal-Cost Multi-Path) routing. ECMP is built-in to the Linux kernel and has improved significantly over the last few years. This solution didn’t end up working out as I had hoped as I saw inconsistencies with traffic across both lines and upload traffic only seemed to be using one line at a time.

This is where TEQL comes in. On the face of it, TEQL looks really easy to implement which made me worry about how well it’d actually work (I guess I’m used to technology filling me with rage). Turns out, it works pretty well. All you need is your standard PPP configuration in /etc/ppp/peers/ where I have two almost identical files for each connection (PPP logins are different). It looks a little something like this:

user <pppoe_username>
plugin rp-pppoe.so
ens224
noipdefault
nodefaultroute
hide-password
lcp-echo-interval 1
lcp-echo-failure 10
noauth
persist
maxfail 0
mtu 1500
noaccomp
default-asyncmap
+ipv6
ipv6cp-use-ipaddr

In addition, I have a bit of config in /etc/network/interfaces to bring up the interfaces at boot time. The MTU of 1508 on the NICs themselves is to allow the additional overheads of PPPoE and an MTU of 1500 on the PPP interface when it comes up. This is why I enabled jumbo frames on my other network equipment further up this page.

auto dsl-provider
iface dsl-provider inet ppp
        pre-up /sbin/ifconfig ens224 mtu 1508 up
        provider unchained
        mtu 1508

auto dsl-provider
iface dsl-provider inet ppp
        pre-up /sbin/ifconfig ens256 mtu 1508 up
        provider unchained-ttb
        mtu 1508

Now all I needed was the magic of TEQL. Initially, this didn’t want to work, then I realised that I needed to load a kernel module before doing the configuration. Simply adding ‘sch_teql’ to my /etc/modules file ensured this was loaded at boot time. And if you want to load the module without rebooting, simply run ‘modprobe sch_teql’ at the command line.

Finally, all that was left to do was creating a virtual device named ‘teql0’, bringing it up, assigning my PPP devices to it and ensuring the default routes for IPv4 and IPv6 utilised the teql0 device for its default gateway. This was achieved with a small script that sits in /etc/ppp/ip-up.d/routing and gets automatically run when the PPP interfaces get brought up.

#!/bin/bash

tc qdisc add dev ppp0 root teql0
tc qdisc add dev ppp1 root teql0
ip link set teql0 up
ip route replace default scope global dev teql0
ip -6 route replace default scope global dev teql0

To see this work in all its glory, I just had to look at the local routing table using ‘ip route’ and ‘ip -6 route’ (some link-local addresses have been redacted from the output below).

# ip route
default dev teql0

# ip -6 route
default dev teql0 metric 1024 pref medium

You can also check that tc (traffic control) is seeing the teql0 interface correctly with the 2 PPP interfaces assigned to it:

# tc -s qdisc
qdisc teql0 8032: dev ppp1 root refcnt 2
 Sent 228 bytes 3 pkt (dropped 0, overlimits 0 requeues 0)
 backlog 0b 0p requeues 0
qdisc teql0 8039: dev ppp0 root refcnt 2
 Sent 228 bytes 3 pkt (dropped 0, overlimits 0 requeues 0)
 backlog 0b 0p requeues 0

It’s worth noting that I route a /29 IPv4 prefix and a /48 IPv6 prefix down to me so have an additional interface on the system with IP’s configured from those subnets and routed further to my pfSense box for actual use.

Conclusion

So, what does this solution look like on a speedtest with one connection synced at 60M down and the other at 59M down and upload speeds around the 14M and 12M marks, respectively.

By default, speedtest.net uses multi-threaded connections. I wanted to see what single-threaded performance was like. So kicked off a test download from a Hetzner speedtest site.

I’ve seen this hit around 12-14MB/s depending on what else is going on, so that is pretty impressive.

During my searches about teql, I read that TCP reordering could be a problem but I didn’t see any real evidence of this in my case when analysing a tcpdump on the router. Thankfully, all other applications, VoIP, gaming, etc have been spot-on and I haven’t noticed any negative performance implications.

Finally, if you want to read more about tc (traffic control) and teql (true link equaliser). I would suggest heading over to https://www.tldp.org/HOWTO/Adv-Routing-HOWTO/lartc.loadshare.html and https://en.wikipedia.org/wiki/Tc_(Linux).

Sky Fibre on Ubiquiti Edgerouter Lite

Unlike most UK based ISP’s, Sky use MER authentication instead of PPPoE authentication. In order to make Sky Fibre work with your EdgeRouter or indeed many other devices, you’ll need to send a DHCP client identifier. This is really easy. Before you carry out the steps below, the following it is assumed you have an external VDSL modem which is connected to eth0 of your EdgeRouter. Suitable modems include the Huawei HG612 and Draytek Vigor 130.

  1. Go through the basic wizard setup for WAN and LAN in the EdgeRouter GUI, selecting DHCP for the WAN interface.
  2. Then once this is complete, simply login to the EdgeRouter using SSH, enter the configuration mode and set the dhcp client identifier. After you have carried out these steps, give your EdgeRouter a reboot and everything should spring into life.

ssh ubnt@<edgerouter_ip>
configure
set interfaces ethernet eth0 dhcp-options client-option "send dhcp-client-identifier &quot;userpass&quot;;"
set interfaces ethernet eth0 address dhcp
commit
save

Sourceforge… I’m disappointed

In a hurry to acquire the latest Filezilla installer, I clicked download on the Sourceforge page and then ran the installer for what I thought would be Filezilla. Having forgotten about something I learnt a few months back (maybe even over a year ago), many Sourceforge downloads have now been polluted with adware and ‘unwanted’ software which could be perceived as malware or spyware. In my haste I clicked next.. next and next only realising at the last second that I had just allowed Norton 360 and nefarious browser plugins to be installed. I wasn’t happy…

Removing the software even required me to reboot which isn’t something it asked me to do after installation. Suffice to say, removal of the software seemed to get rid of most of the rubbish and then a quick scan with MalwareBytes seems to have done the rest. It is shameful that Sourceforge have allowed this to happen.

I also found this on my searches which has a more detailed explanation of some of the software being installed.

Broadband Usage Limits

Most of the mainstream ISP’s such as Virgin Media, Talk Talk, BT and Sky all offer broadband connections with an ‘unlimited’ or ‘unmetered’ bandwidth consumption. ISP’s who do this will tend to hide in the small print that they will traffic manage your connection during peak periods. This basically means that if you exceed a certain threshold, i.e. you download more than 10GB of data between the hours of 6pm and 10pm they will traffic shape your bandwidth from it’s maximum of 80mb down to 20mb (for example). Virgin Media are renowned for doing this and although they offer a 152mb connection, they sometimes apply traffic management policies if you’re using a lot of bandwidth during peak times and they have other sneaky tricks such as using transparent proxies and hijacking your DNS to point to their own caches for things like Netflix and Youtube. This has it’s own issues but is best reserved for another post!

On the other side of all this are smaller ISP’s who can’t afford to offer unlimited bandwidth but instead offer you a fully unfiltered and non-traffic managed connection. The catch is of course that you are often given a small bandwidth allowance on their FTTC packages (not so much on their ADSL packages) and to get a higher allowance, you will have to pay a premium. A couple of the smaller ISP’s operating in this manner are Xilo and AAISP (Andrews & Arnold). The former offer unlimited bandwidth ADSL packages but these are comparatively slow to the FTTC packages they also offer but with a cap. Taking their 500GB option will cost you over £50/month. The latter ISP have usage caps on all of their residential connection offerings (both ADSL & FTTC) and to get a 300GB bandwidth allowance (the maximum available) with them will cost you an extra £20 on top of your normal monthly cost for the connection.

I’m not a heavy user in terms of downloads month on month so generally these limits don’t pose too much of an issue for me. However, I’m beginning to watch a lot more Sky Go, Now TV, 4OD etc and just tonight I bought GTA5 for the PC which when I went to download it on Steam comes out at a huge ***60GB***. As I’m with AAISP, I immediately had to top-up my allowance by 50GB (£10) to allow me to continue with the download as I was quickly coming towards the end of my 100GB monthly allowance. Coupled with all of this, I would like to take monthly backups of VM’s running in a datacenter to my local NAS here at home, but this just isn’t feasible when some of the VM’s attached disks total more than triple my monthly bandwidth allowance!

I have proposed a possible solution to AAISP before in that they offer a vaster amount of bandwidth allowance, i.e. 1TB a month but throttle my 80mb FTTC connection to 20mb down but allow burst traffic to 80mb. As I’m not a heavy user for most of the month, this would probably suit me down to the ground. In order to get around this issue, I’ve had to order a new connection from a mainstream provider which has an ‘unlimited allowance’, however in general I concede that if you were to try to take advantage of this 24/7 you might find very quickly that you get complaint letters from your ISP. So I think rather that a higher solid limit be set and agreed to and then there is no differing interpretations of what unlimited means.

Cable Trunking

One of the few disadvantages to being a geek is the fact that hiding the myriad of cables you inevitably have running around can sometimes prove to be difficult. After some brief investigation into the best method of hiding said cables, I came across some cheap but seemingly effective trunking at Clas Ohlson. The ‘D-line’ trunking perfectly suited my requirements for hiding away 3 disobedient solid core Ethernet cables and at £5.99, you can’t really go wrong!

I also needed some floor trunking to go across the doors for the same cables as they were becoming a bit of a trip hazard. Thankfully, I managed to get a couple of these from Clas Ohlson as well which has tidied things up nicely!

Observium Custom Agent Module

Observium has been my graphing system of choice for a long while now, originally brought in to replace Cacti and Munin. Due to the brief documentation provided on their site on how to add new graphs using the agent system, I embarked on discovering this for myself (with the help of their guide) and as a result, I have put together the following guide.

Pre-Requisites:

1) The Observium agent must be fully installed and operational on the server you’re trying to monitor (check it’s listening on TCP/36602);
2) You’ll need a little bit of patience as it can be a little bit fiddly to get working, but very much worth the effort.

Create module on monitored server


#!/bin/bash

procs=$(ps -ef|grep "[h]ttpd" | wc -l)

echo "<<<app-apache_procs>>>"

echo $procs

It’s very important to start the script with the following (substituting *yourapp* with a name such as ‘apache_procs’):


echo "<<<app-*yourapp*>>>"

Once you have created this, make sure the file is executable and that it’s in the ‘/usr/lib/observium_agent/local’ directory so it can be executed by the agent:


# chmod +x myapp.sh && mv myapp.sh /usr/lib/observium_agent/local

You can now test this is working by connecting with telnet to the agent port of the server in question:


# telnet localhost 36602
...
<<<app-apache_procs>>>
12
Connection closed by foreign host.
...
#

Create Observium side scripts for collection and generation of graph data

Now that we have the easy bit out of the way, it’s time to create the relevant scripts for the module on the Observium server itself so that it is able to generate graphs and store RRD data. These consist of the poller include, application graph include and html page include.

In our guide, we use the base directory of ‘/opt/observium’ and you may need to change this to suit your setup. Create the following files on the Observium server:

./includes/polling/applications/apache_procs.inc.php


<?php
if (!empty($agent_data['app']['apache_procs']))
{
$rrd_filename = $config['rrd_dir'] . "/" . $device['hostname'] . "/app-apache_procs-".$app['app_id'].".rrd";
list ($procs) = explode("\n", $agent_data['app']['apache_procs']);
if (!is_file($rrd_filename))
{
rrdtool_create($rrd_filename, " \
DS:procs:GAUGE:600:0:125000000000 ");
}
rrdtool_update($rrd_filename,  "N:$procs");
}
?>

./html/includes/graphs/application/apache_procs.inc.php


<?php
if (!empty($agent_data['app']['apache_procs']))
{
$rrd_filename = $config['rrd_dir'] . "/" . $device['hostname'] . "/app-apache_procs-".$app['app_id'].".rrd";
list ($procs) = explode("\n", $agent_data['app']['apache_procs']);
if (!is_file($rrd_filename))
{
rrdtool_create($rrd_filename, " \
DS:procs:GAUGE:600:0:125000000000 ");
}
rrdtool_update($rrd_filename,  "N:$procs");
}
?>

./html/pages/device/apps/apache_procs.inc.php


<?php

/**
* Observium Network Management and Monitoring System
* Copyright (C) 2006-2014, Adam Armstrong - http://www.observium.org
*
* @package    observium
* @subpackage applications
* @author     Adam Armstrong <adama@memetic.org>
* @copyright  (C) 2006-2014 Adam Armstrong
*
*/

$app_graphs['default'] = array('apache_procs' => 'Processes');

// EOF

Conclusion

If you have carried out the steps above correctly then you should see a graph populate underneath the ‘Apps’ tab in Observium for the host you’re monitoring (it can take 5 minutes for the broken graphs to appear and a further 10 minutes for any sort of useful data to appear on the graph, so be patient!)

If you don’t see anything under the apps tab or your graphs are broken after 10 minutes then you can debug the process by running the poller manually with the debug switch as such:


# cd /opt/observium
# ./poller.php -h <monitored_host> -d

The above command will show lots of output including any database queries it executes relating to MySQL. It should also show the creation or update of the RRD files relevant to your various agent modules.

If everything is working, you should see something similar to below (please note there is significant amounts of data on this graph already as it had been populating for a good few hours):

apache_procs